Plating Kits
Based upon the same principles and chemicals used in industrial electroplating systems, our tank plating kits are ideal for almost all objects and can give a wide range of finishes.
Our kits are capable of plating onto various metals including steel, iron, brass, copper and more. If you would like to plate onto aluminium and it’s alloys, check out the GP Allyseal Zincate for further information.
If you are not sure which kit is right for you check out our FAQs & Help page or drop us a line!
We have three basic kit types: 5L, 10L and Ultimate. Our 5L and 10L kit contain the chemicals, electrical connectors, safety equipment and guides to set up basic pre-plating, plating and post-plating tanks. Our Ultimate kits comes with extra accessories for larger volume systems. All kits have the option to add a digital power supply; the PS201ADJT.

ELECTROPLATING SUPPORT
Electroplating can seem daunting, especially when you see some of the amazing things people can create. Fear not, we have you covered! In this section of the website we will guide you through the entire process, from deciding what setup you need to setting up the kit and electroplating items.
Check out the menu list below to skip to the section that you need.
1. What Is Electroplating?
The principle behind electroplating can be easily described as the deposition of a metal layer on a base material, referred to as the work, using direct current through a solution called an electrolyte. In electroplating, the work is made the cathodes and the metal to be deposited is made the anode, these are connected to the negative and positive ends of the power supply respectively. The electrolyte is a water based solution containing ions of metals and salts which flow with the current. If like us, you like looking even further into the science of electroplating, you can read more about it in our book.
An incredibly large number of metals can be plated, although, some are not as easy as other. Some of the most commonly used metals in the wider electroplating industry are; nickel, chromium, gold, silver, copper, tin, brass, and zinc. For home electroplaters, the two most common metals used are zinc and nickel. Both of which give greatly increased corrosion and abrasion resistance and can be used to alter the appearance of items.
Metal deposition chart. The chart below shows which metal can be deposited onto which other metals.

2. What supplies do I need?
The tools required for electroplating can be broken down into essentials and extras. These items (except water) are conveniently measured and supplied in our kits.
Essentials:
-
PPE: gloves, goggles, mask
-
Electroplating tank: PP or HDPE plastic or glass
-
Electrolyte chemicals: metal salts, and other salts or acids
-
Water: distilled, deionised or pure water (not tap water)
-
Brighteners and Levellers for some types of plating
-
Electrical connectors: wires, copper wire, bus bar
-
Power Supply: adjustable, or fixed output when using the current controller
-
Anodes
-
Anode Bags: PP PES or Nylon rated below 10 microns (ideally 1 micron)
-
Cleaning Chemicals
Extras:
-
Tank Heater
-
Electrolyte Filter
-
Electrolyte Agitator
-
Rinse bottle
-
Extra Tanks
-
Extractor Fan
3. How do I keep myself safe?
The absolute most important aspect of the entire electroplating process is safety. Please, please, please do not skip or miss any safety steps. Doing so, either at the beginning of your electroplating journey, or during, may cause serious harm to yourself or others. If you have been electroplating for quite some time, please do not get complacent as safety should be and is always the most essential step to follow.
The absolute minimum safety precautions needed for electroforming are; PPE, adequate ventilation, a safe electroplating area, neutralising solution and an undisturbed space.
Hazards & Risks
The main sources of risk, hazards, associated with electroplating are the chemicals in the electrolyte and the electrical circuit.
Material Safety Data Sheets (MSDS) can be downloaded from our website or from different online sources. These give a clear and concise description of the chemicals and their associated hazard identification.
PPE
Gloves should be worn at all times! Not only will wearing gloves protect your hands from potential chemical exposure, but it also prevents the spread of contaminants onto your items and into the electroplating tank. On a personal note, we would advise against disposable and single use gloves as they have a negative impact on our world and environment.
Goggles should be worn whenever chemicals or electrolyte are in use. This includes initial mixing, filtering, maintenance, rinsing and especially when placing items into and removing items from the electroplating tank.
The main function of masks or respirator is to protect your airways; your mouth, nose, throat and lungs. Masks should be used at the same time as goggles; initial mixing, if using tank agitation by air, etc. A mask should also be used when the ambient room temperature is lower than that of the tank. When this temperature difference occurs, liquid will evaporate from the electrolyte with the potential to take other chemicals with it. A mask should also be used when painting with solvent based paints or sealers. Finally, if the environment in which electroplating does not have adequate ventilation or if there is no direct extraction masks should be worn.
Safe Environment
Creating a safe environment to electroplate in is important in regards to keeping yourself and others safe. One thing to consider before setting up your own tank is where it will be placed. Having the electroplating system in your house is not advised unless you have all of the safety precautions in place.
Below is a list of questions and advised answers to help think and setup an ideal electroforming area.
-
Will you be electroplating inside your house or outside in a shed/workshop/garage?
-
Is there already a clear space to electroplate in?
-
Is there any form of ventilation already? (e.g. doors, windows or extractor fan)
-
Will your electroplating area be disturbed?
-
Is there anything close that will be affected by fumes or accidental splashes?
4. How do I set up the kit?
For full instructions on how to setup the kit, including electrolyte mixing, follow the instructions included with the kit.
As a general guide, the workflow for setting up a 5L copper kit should be:
-
Warm 3.5L of distilled water with the heater if included
-
Add each of the electrolyte chemicals individually and stir until fully dissolved
-
Connect anodes, insert into anode bags and immerse in the electrolyte (if hanging anodes on copper wire make sure that the copper wire attached to the anodes is out of the electrolyte)
-
Connect the anodes to the positive of the power supply
-
Connect your items to the negative of the power supply
-
Insert internal filter if using

Anode Material
The choice of anode material is important in achieving the best results. It may be enticing to use bits of scrap metal or old zinc parts but these will have a detrimental effect on the zinc deposits. This is due to the presence of oxygen, oxides and impurities. The impurities, such as other metals, oxidise and ions can become deposited onto your item, causing dullness, roughness, black marks and burning. The best anode material to use is one with a high purity; 99% and above.
Hanging the Anodes
Before you start, put on gloves. Just touching the anodes with your fingers will transfer grease onto the anodes and oxidise them. While this is only a small amount of oxide, it can affect the anode film that forms during plating.
There are many ways of hanging your anodes. We find that hanging zinc, copper, brass or bronze anodes from the edge of the tank using copper wire is a simple way of immersing them in the electrolyte. Cut about 1 meter off the copper wire and thread through the hole in a lead anode and twist together the end of the wire to secure the anode. Measure about 15 cm from the first anode and thread on another anode, twisting it to secure it in place. When hanging nickel anodes we recommend using short lengths of titanium wire to hang them on.
If using anode bags then put the anode bags on and secure them with an elastic band. Anode bags aid in reducing the amount of impurities in the electrolyte and also reduce the particle size of dissolved anode, leading to more uniform and even plating. In some cases it is recommended to use two anode bags of two different ratings. The inner bag should have a rating of 10 microns. The outer bag should have a rating of 1 micron. This gives the best filtration. The anode bags should be made of polypropylene, polyester, nylon or Dynel check which type is best for the electrolyte that you are using.
Next, hook the anodes over the lip of the tank making sure the copper wire that is attached to the anodes is above the level of the electrolyte. Having the copper wire in the solution will dissolve the wire and drop the anodes into the tank. If using nickel anodes hung on titanium wire you can completely immerse the nickel anode in the electrolyte. Space the anodes out evenly around the inside of the tank. Run the copper wire under the rim of the tank to secure it.
Once you have finished electroplating and will not be doing any more for more than a week then the anodes should be removed from the tank, rinsed and placed into a sealed container to prevent oxidisation. Not removing the anodes can cause them to dissolve and increase the levels of dissolved metal in the tank which can cause cathode polarisation. When zinc/nickel alloy plating the anodes should only be hung in the tank just before you start plating and as soon as you have finished they should be removed.
Keep an eye on your anodes as the more electroplating you do the more the anodes will dissolve. They will eventually need replacing with fresh anodes.
Wiring the Circuit
Once the anodes are secure in the tank, you can begin to assemble the rest of the circuit. First, strip both ends of the blue and brown wire to expose the internal copper fibres. Attach one end of the blue wire to the negative end of the power supply and the other end to either the bus bar (a conductive bar which spans the top of the plating tank used to hang items) or the copper wire connected to the part to be plated. Connect one end of the brown wire to the positive of the power supply and the other end to the current controller.
Some power supplies are simple and will only supply constant current. Other, more complex power supplies will have two options, CC or CV (constant current or constant voltage). Electroplating is dictated by the current and not the voltage so make sure the power supply is set to constant current and not constant voltage. Due to the scientific principle of Ohms law, when using a constant current in electroplating, the voltage will naturally fluctuate as the resistance changes when metal is deposited.
Current Controller
If you are not using a power supply, assemble the current controller as per the diagram below. Place the bolts through the holes on the inside of the plastic U and secure with a nut on each bolt. Now screw one nut 10 mm down the bolt, loop one end of the resistance wire around the bolt and secure it with another nut. Repeat this for the other side. Attach the brown wire to the positive terminal of your power supply and attach the other end to one of the bolts of the current controller in the same way you attached the resistance wire.
Connect a length of copper wire to one of the crocodile clips and clip the clip into the right end of the resistance wire as per diagram. Attach the other end of the copper wire to the copper wire attached to the anodes as per the diagram above.
5. Cleaning
For information on cleaning, check out our Cleaning Help & Support page.
Proper preparation is paramount particularly when plating precious parts. The importance of cleaning cannot be understated. The cleanliness of a part will dictate which cleaning methods will be used before plating. It is worth spending as much time as possible cleaning a part ready for plating as soils that have not been removed from the surface will reduce the quality of the plate and may even damage the electrolyte making it unusable.
Parts can have many different types of soils on the metal, the most common of which are; shop soils (dirt, dust, swarf, cutting oil, fingerprints), polishing and buffing residues, metallic smuts, carbon smuts and oxides and old plating
There are a range of cleaning methods to get rid of these; soak cleaning, electrocleaning, mechanical cleaning, solvent cleaning and so on. Included in this kit are two of these, alkaline cleaner and acid pickle.
The steps in cleaning are:
-
Remove thick oil and grease with a degreaser
-
Steps 1 – 6 can be achieved using the GP1 alkaline cleaner supplied with the kit. Follow the guide supplied for more information.
-
Remove oxides and old zinc plating mechanically (sand/polish) or by acid dip
-
Remove any polish residue with a solvent
-
Remove solvent traces with detergent and hot water
-
Rinse well
-
Dip or electroclean in GP1 Alkaline Cleaner (or detergent and water)
-
Rinse in very clean water checking that the part passes a water break test so it should have an even sheen of water on it with no beading
-
Activate prior to plating
Activating
The final step before plating is an activation dip. An activation dip is required to prepare the surface of a metal for plating. The surface oxides are stripped leaving pure metal. This can be done using the dry acid pickle supplied with the kit. Again, the guide for use is also supplied in this kit. After the dip in an activation tank, rinse well in clean water checking that the part passes a water break test and plate immediately after. Doing this will prevent the build-up of oxides on the surface which can cause problems during plating.
Testing Cleanliness
There are a few easy tests to check if a part is cleaned and ready for plating. The first is a water break test. This will detect if there is any grease or oil on the surface. Dip the part in clean water. If the water film is continuous and uninterrupted then the surface is clean. If the water beads, then this indicated the presence of soils. The white cloth test can also be used. This is simple the wiping of a clean white cloth along the surface of an item. If it comes away dirty, then more cleaning is needed.
Hydrogen embrittlement
Hydrogen embrittlement can occur when cleaning and plating high tensile bolts; bolts marked as 9.8 and above.
If you are plating high tensile bolts follow the below process:
-
Mechanically remove rust and old plating. Do not acid clean!
-
Wash or dip in GP1 alkaline cleaner until the part passes a water break test
-
Rinse
-
Acid activate in dry acid salt solution for 30 seconds
-
Rinse well
-
Plate immediately. Keep plating time short where possible - 10 to 15 minutes depending on current
-
Rinse well
-
Oven cure as per the Hydrogen Embrittlement section in the post plating section below
-
Passivate
-
Rinse and dry
6. Pre-Electroplating
Current Density
Current density is the driving force for the deposition of metal and determines the total amperage needed from the power supply. As a simple rule, for all metals, the current density should be 0.1 amps per square inch (1 inch2 = 6.45 cm2). Inches are used as it produces a clean, whole number.
Let’s use a standard M8x55mm hex bolt as an example. The total surface area, including the area of the thread (which is much higher than just a simple cylinder), is around 3.9 square inches. This would therefore need a current of 0.39 amps to achieve a nice uniform deposit of metal. If 5 bolts were being plated at a single time then the current needed would increase to 1.95 amps. This is because the total surface area of items in the tank needs to be accounted for. In this example, it would be 5 x 3.9 square inches = 19.5 square inches. One thing to note is that setting the voltage isn’t critical, the only thing you must concentrate on is the current. Your power supply should be set to give out a constant current and not constant voltage.
For more information on current density, the anode sun analogy, edge effect and object orientation, check out our electroplating book!
Object Orientation
Due to the current taking the path of least resistance and the varying current density across the surface of an item, the orientation of an object is important in achieving the finish you would like. To achieve a uniform deposition across the whole surface area of an item, it should be located as far away from anodes as possible, or as centrally between multiple anodes.
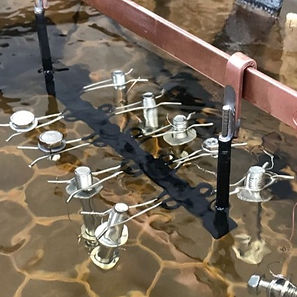
Wiring Items
Items must be connected to the power supply, that is, they must be immersed in the solution and hung by a conductive wire to make it part of the circuit. This is most commonly and most easily done using copper wire. There are a number of ways of attaching copper wire to your items. As long as the wire is in contact with the item, electroforming will occur. Some ways include; wire wrapping, drilling and glueing, crocodile clips, hooks, and baskets. Take a look a the image to the right to see one of our customer’s homemade racks.
Pre-Electroplating Checks
Before turning on the power, a few checks should be undertaken. Make sure the pH is correct; for nickel, the pH slowly increases over time and this should be checked every month if using constantly. The temperature should lie within the operating range (given in the guide with your kit). For most metals, the range will be between 18ºC and 35ºC. Make sure there is some agitation in the tank (can be simply mixing with a plastic spoon every few minutes). Also make sure there is some level of filtration, and that it is on and is working correctly.
7. The electroplating process
Now that your part is cleaned, and activated, it is ready to electroplate! The best thing to do first would be to practice on an item that is not important, and you can make mistakes with. Also Wear PPE! Put on gloves, goggles and mask.
Now is the time to immerse your items in the electrolyte and connect them to the bus bar and the negative of the power supply. Make sure to check their orientation to achieve the results you would like.
Make sure that the power is off, and the current is set to zero before you put anything in the tank. There can be a bit of misinformation out there that says to have the current on and high when you first put your items in the tank. Please don’t do this, it will give you rubbish results pretty much all the time.
Basic zinc plating process on clean steel is as follows:
-
Alkaline clean until the part passes a water break test and rinse
-
Dry acid pickle dip for 1 minute and rinse and check again that it passes a water break test
-
Plate for minimum of 20 minutes and rinse very well very well under running tap water for 3 minutes
-
Passivate and bucket rinse rather than tap rinse
-
Allow to dry and cure
Power On!
Now that the parts are in the tank, we can turn the power on. From zero, increase the amperage to achieve the current density of 0.1 amps per square inch. If you are uncertain of the surface area, in fact, in all circumstances slightly underestimating the surface area and setting the current low will be safer by avoiding burning. Set the voltage to 5V and leave it there. You will notice that the voltage change over time. This is due to Ohm’s Law as mentioned earlier.
If you look closely there will be tiny bubbles forming on the work. After 2 minutes you should start to see a bright zinc deposit forming. If there is little or no plating to be seen then it is an indication that the current it too low so increase the current and check again after another 2 minutes and so on.
If you see excessive fizzing and any dark staining on the item then it is a sign that the current it too high. At this point you would have to remove the part, strip the plating off and prepare for plating again.
8. Troubleshooting
Low Brightener Levels
Symptoms: The newly formed layer will look: dull, rough
Causes: Low level of brightener. The brighteners will be codeposited with the metal and become part of the new surface. This means the levels of brightener decrease as you do more electroplating
Fixes: Add more brightener and test.
Test: If plating a silver type metal such as zinc, nickel, replica chrome, silver or tin they use a piece of copper or a copper coing to test on. If you are plating with copper, brass, bronze or gold then test onto a 10p coin or a nickel plated item.
-
Take a 10p coin (or a piece of copper)
-
Clean it well with warm water and soap - this removes traces of grease and oils
-
Clean it with wire wool, wire brush, sand paper - this removes any dark oxides
-
Rinse well in water
-
Electroplate for 10 minutes
The item should look bright and shiny with a new layer of metal. If the surface looks like the symptoms above, add more brightener into the tank and repeat this test.
Prevention: Observe brightness of your items after electroplating and add more brightener if they are beginning to look dull. The good thing is that you can add quite a lot of brightener before it is too much (unless you add loads of it). Having extra brighteners will cause the plating to look extremely shiny!
High Current
Symptoms: Slightly higher current will form nodule on areas of high current density. Very high current can cause; burning, dark staining, dullness, roughness , destruction of brighteners
Causes: The current setting is too high for the surface area of items in the tank
Fixes: Remove plating and start again
Prevention: Work out surface area before plating and set current to 0.1A per square inch
Low Current
Symptoms: Very slow plating, nothing appears to be happening after 2 minutes, after 10 minutes the low current areas such as flat surfaces or recessed areas are dull.
Causes: The current setting is too low for the surface area of items in the tank
Fixes: If spotted early enough then increase the current and check after 2 minutes until you can see even plating, if not strip and start again.
Prevention: Work out surface area before plating and set current to 0.1A per square inch
Low and High Temperature
Symptoms: High temperatures lead to dull and rough plating through the destruction of brighteners. Low Temperatures will give slow, patchy and dull plating.
Causes: Temperature is outside of the working range of check temperature settings for the type of plating you are doing 20ºC - 35ºC
Fixes: Heat or cool the electrolyte. Add more brightener and test using 10p coin test above
Prevention: Check electrolyte temperature before placing items in the tank
Poor Rinsing
Symptoms: Multicoloured staining and oxidisation on the surface
Causes: The electrolyte has not been completely rinsed off an item
Fixes: Rinsing the part in acid will remove any oxidisation and staining on the surface
Prevention: Rinse well and change rinse water once it becomes contaminated
Poor Electrical Connections
Symptoms: Fluctuating voltage and in sever cases amperage causing slow electroplating that appears dull, rough and patchy. Amperage is at zero while voltage is at maximum leading to no electroforming at all
Causes: The circuit has been broken
Fixes: Check each connection, especially those near to the electrolyte (e.g. anodes and bus bar) The copper wire hanging the anodes will eventually erode away due to the vapours from the electrolyte and creeping metal crystals
Prevention:
- Regularly check the electrical circuit and replace wires that are starting to degrade.
9. Post-Electroplating
Hydrogen Embrittlement
If you have plated high tensile parts as mentioned in section 2.4 then they will need oven curing before passivation.
Cure in an oven at 190 – 220°C follow times below as per grade and diameter of bolt or stud.
Passivating
As with every step of the plating process, wearing the correct safety gear in critical! Once you part has been plated and
rinsed you can now apply a passivate. Included in this kit are two passivates, Clear/Blue and Yellow/Gold. The passivating
process is very simple. Once your part has been plated, rinse very well in clean water and then immediately dip the part in
the passivate tank. Follow instructions for passivate mixing and use in the Passivate section further on in the guide.
Yellow/Gold:
-
Rinse immediately after plating in clean water (ideally for 3-4 minutes in running tap water)
-
Dip in dry acid salt solution or 5% HCL solution until you get an even fizz over the item
-
Rinse well again in clean water
-
Immediately submerse in passivate for 30-90 seconds depending on shade of colour required
-
Keep moving the items in the passivate all the time it is in there.
-
Rinse well with clean water
-
Allow to dry or dry with a hair dryer to stop drip marks
Clear/Blue:
-
Rinse well after plating in clean water, ideally 3-4 minutes under running tap water
-
Immediately submerse in passivate for 20-40 seconds depending on temperature of the passivate
-
Rinse well
-
Allow to dry or dry with a hair dryer to stop drip marks
Allow the parts to dry for around 24 hours. Check the he optimal temperature for the type of passivate you are using.
